
Water ingress in a motorhome is simply unwanted water getting into the structure, and it matters because it can quietly wreck the vehicle’s body and decrease motorhome value in the long term.
When you monitor water ingress issues, furnishings and surfaces, and you also make your motorhome far more attractive to the next owner or dealer, which can mean thousands of pounds difference at trade-in time.
Many motorhome owners in the UK think of ingress as a bit of a nuisance, but the fact is it is often described as a motorhome’s “worst enemy”. Water can creep in through screw holes, roof joints, windows and other fittings, soaking wood and insulation for months while everything still looks fine on the surface.
By the time you notice mould, staining or a soft floor, the damage may already be extensive.
Professionals check ingress with a moisture or damp meter, noting % readings from walls, floors and ceiling to produce formal damp reports that underpin warranties, insurance decisions and serious repair quotes.
Modern materials and clever construction have reduced risks, but no model is completely immune.
Preventing and fixing ingress early preserves structural integrity, keeps mildew and health risks at bay, protects electrics and helps your home-on-wheels feel like a safe, dry area rather than an issue on the drive.
With that in mind, it makes sense to start with the basics: what actually causes water ingress in motorhomes and campervans in the first place?
What causes water ingress in motorhomes?
Water ingress in motorhomes happens when water enters gaps in the outer shell and soaks the interior. In practice, that means any breach in the weatherproof skin of the vehicle has the potential to become a water leak if it is not properly sealed and maintained.
The main weak points are where panels, windows and accessories interrupt the shell.
Panel joints, screw holes, window and door apertures, rooflights, vents, lockers, external sockets, cable entry points, bike racks, roof racks, solar panels, satellite dish brackets, Wi-Fi antennas and awning rails all involve holes and joints that must resist wind-driven rain.
In traditional coachbuilt bodies, a wooden frame, GRP or alloy skin and hundreds of screws along trim strips create many chances for a small gap to appear. Rusting screws and enlarging holes weaken surrounding seals.
Sealant breakdown is a leading cause of ingress. Older sealants dry out, lose flexibility and crack under UV, age and heat. Once this happens at joints, corners or around fittings, water can track into the walls and floors.
Dynamic loads make things worse: you are driving a big box over potholes and rough roads, so the body flexes.
At 50mph or more in heavy rain, the “jet-wash” effect can force water through gaps so small you would barely see them by hand.
Environmental factors also play a part. Tree sap and algae growth on the roof can attack sealants and trap moisture.
Freeze–thaw cycles widen tiny winter cracks over years. Impact damage to corners, skirting and wheel arches can create new leak paths. Internal issues such as cracked shower trays or leaking pipes can feed water into floors from the inside, while capillary action and gravity carry water along cables and structure, so the visible damp area is often far from the true entry point.
Because this mix of causes can be confusing, it helps to understand how water ingress differs from everyday condensation and general “damp” inside your van.
What is the difference between water ingress and condensation/damp?
Water ingress is liquid water penetrating under the exterior skin of the motorhome and soaking into walls, floors or roof, where it can damage timber framework, insulation and wallboard over time.
Condensation-related damp, by contrast, is moisture from day-to-day living inside the vehicle which forms on cold surfaces without reaching the structure.
When you cook, shower, breathe and dry clothes in a confined space, the air becomes humid and that moisture condenses on windows, metal surfaces and soft furnishings. This damp usually appears as misted windows, surface moisture, mildew in corners or slightly clammy bedding. Often, you can manage it with better ventilation, dehumidifying products and some changes to your habits rather than major repairs.
Water ingress acts differently. It sneaks into the body through gaps and holes, saturating materials that were never designed to stay wet. Unlike a damp house with wet plaster, a motorhome body does not always smell strongly when structural components are wet; odours appear mainly when carpets, fabrics, or mould are affected.
Internal plumbing failures sit somewhere between the two. The water comes from inside, but a cracked pipe or failed joint can drip into hidden areas and behave just like external ingress. Both condensation and ingress can encourage mould and pose health risks, but only true ingress steadily destroys structure and resale value if you do not stop it at source. This is why identifying where the water actually gets in is so important.
Where are the common ingress pathways and weak points?
Common ingress pathways on a motorhome are the places where the weather shell is interrupted, joined or drilled. Each joint, hole, or accessory can form a weak point.
Typical external problem areas include:
- roof seams
- skylights and rooflights
- Vents
- rooftop accessories
- window frames
- entry doors
- service hatches
- external lockers
- cable glands
- awning rails
- skirting joints
- wheel arches
- wall-to-floor joints
Any factory or aftermarket hole in the outer skin – even a small 25mm hole for a cable gland feeding a solar panel – can become a leak path if the sealant or gasket fails.
Older designs with screwed aluminium rails and beading are vulnerable as screws corrode, lose tension and open up hairline capillary gaps.
The body’s lower sections take most of the wear. Wheel arches, lower corners and the area where the sidewall sits on the floor are in the firing line for road spray and standing rainwater. Road grime, salt and grit all combine with moisture to attack coatings and sealants.
Accessories can also cause problems. TV aerials, racks, ladders and satellite dish mounts introduce extra fixings. If installers use the wrong products or leave gaps around cable conduits, water can be channelled straight into the body instead of staying outside.
Internally, cracked shower trays, loose plumbing fittings, tank connections and heater fittings may create hidden pools that slowly feed water under floors and behind furniture.
You might first notice a soft patch near the bed or cab step, but the true leak point could be several feet away. Spotting the most vulnerable areas begins with the roof, which has its own set of challenges.
How vulnerable is the motorhome roof to leaks?
The motorhome roof is particularly vulnerable to leaks because it is relatively flat, as minimal guttering and often holds water, especially when parked on uneven ground or in storage. When water collects around roof joints and accessories, the risk of sealant breakdown and panel damage rises sharply.
Over time, sunlight, tree sap, bird droppings and algae, slowly degrades sealants around skylights, vents, accessories and edge trims.
Pooled water on the roof keeps those areas wet for longer, accelerating the process. In cold UK winters, freeze–thaw cycles mean water in tiny cracks freezes, expands and widens the gaps, turning hairline splits into proper leak routes in just a season or two.
Driving at motorway speeds in heavy rain creates a “pressure washer” effect along the roof. That jet-wash of rain can force water under loose seals, into screw holes and around poorly bedded accessories.
Routine walking on roofs that are not designed for foot traffic adds another issue: concentrated weight can flex panels, strain joints and create micro-cracks in coatings and sealants.
Some roofs are intentionally not fully bonded to allow the skin to move slightly; a gently “lunar” look on the roof can be normal.
Bubbling or delamination on wall panels is a clear warning.
Aftermarket roof items such as racks, solar panels and air-conditioning units are critical inspection points, because poor installation can bypass even a generous water ingress warranty. One specific accessory that often causes questions is the rooftop air conditioner.
How can rooftop air conditioners lead to leaks?
Rooftop air conditioners can cause water ingress in motorhomes when the condensed water they collect fails to drain properly and instead overflows into the roof structure.
As the unit cools the interior, it removes moisture from the cabin air and collects it in a drain pan, which directs water through drain tubes outside.
If dust, debris or algae clog the drain outlet, the pan can fill and spill over, allowing water to seep past the gasket or fixing points.
Once that happens, moisture can soak into the ceiling lining and surrounding panels, potentially affecting insulation and timber.
Stagnant water sitting in the drain pan also encourages mould and mildew, adding musty odours and health risks on top of structural concerns.
Clean the AC drain pan, outlets and seals regularly, especially before and after heavy-use seasons. Incorrect installation, overtightened or loose fixings and damaged sealant around the cut-out can all compromise the watertight aperture.
To stay on the right side of your warranty and insurance, any significant work on rooftop units is best left to an approved service centre or technicians who understand the specific motorhome model and manufacturer guidelines.
How do window and entry door seals fail?
Window and entry door seals fail because their rubber or foam gaskets age, harden and crack, allowing water to track through tiny channels that open up around the frame.
Over years of exposure to UV, ozone, temperature swings and general weathering, seals lose their flexibility and start to shrink or craze, particularly at the corners and lower edges where water collects.
Faulty initial fitting is another factor. If the frame was never clamped evenly, or if hinges and latches are slightly distorted, you can end up with fine gaps that let wind-driven rain past the seal.
Leaks often appear after long wet journeys or high winds when the cab side is hammered by horizontal rain.
You should regularly inspect window and door surrounds for splits, hardness, missing sections, compression marks, mould or water stains. Any drafts, visible daylight or rattling from the door are warning signs that the seal may already be compromised.
Keeping seals supple with suitable cleaners and lubricants helps extend their life. Some people use silicone-based products, but you must check that any product is compatible with the seal material and glazing type.
Maintaining these areas regularly costs far less than leaving a small gap to become a full-blown leak into carpets and floors. The same principle applies to the joint between walls and floor, which has its own notorious weaknesses.
Why do wall-to-floor joints leak?
Wall-to-floor joints leak because they sit directly in the path of road spray, puddle splash and driving rain, so any failure of sealant or trim at this seam lets water be forced into the floor edge.
As you drive in wet conditions, dirty water is continually thrown at this joint, especially around wheel arches and the rear corners.
In typical construction, the wooden floor is laid first, the sidewalls are mounted on top, and then a plastic or alloy capping strip is fitted along the outside.
Sealant is applied along the top of this capping. If that sealant fails, water can enter the trim and soak into the floor edge and lower wall, unseen from the interior for a long time.
Repeated wetting leads to soft, spongy or “squelchy” floors, particularly near skirting and door thresholds. Repairs are tricky as the floor sits beneath fixed furniture and walls; this is not a simple “lift the carpet and patch it” job.
Older motorhomes, or those with minimal underfloor protection, are especially vulnerable, particularly in the UK, with frequent rain and winter salting.
Any soft spots at the bottom of walls or along the floor edge should trigger immediate investigation, not a “wait and see” approach.
Left alone, this type of leak is a classic route to major structural damage and high repair bills. Internal plumbing faults can have similar effects, feeding water into floor structures from the inside.
How do internal plumbing faults cause water damage?
Internal plumbing faults cause water damage by allowing pressurised water to escape slowly into hidden spaces, where it soaks floors, walls and furniture over time.
Motorhome plumbing uses push-fit, threaded and compression fittings that may loosen with vibration, movement and pressure cycles. Even a tiny seep at a joint can cause serious ingress issues if it drips for weeks.
Typical leak sources include pipe unions behind sinks, showers and toilets, water heater and boiler connections, pump fittings, tank outlets and drain valves.
Joints hidden in service voids and under beds or seating can be particularly troublesome because you rarely see them. Cracked or poorly supported plastic pipes may split due to vibration or freezing, especially if water is left in the system during hard frosts.
In the washroom, cracked trays and poorly sealed fixtures let shower water to escape into the subfloor instead of staying in the tray and waste pipes. Over time, this causes swelling, staining and rot around the bathroom area.
Because plumbing leaks often migrate along flooring or insulation, the visible damp patch may be far from the true fault. Proper diagnosis usually involves systematic inspection and, in some cases, pressure testing the system.
Internal leaks can cause the same rot, delamination and mould as external water ingress and must be treated with equal urgency. The overall risk is also influenced by how the motorhome is built in the first place.
How does motorhome construction affect water ingress risk?
Motorhome construction influences water ingress risk by showing how many potential leak points exist and how the structure behaves when water does get in. Traditional coachbuilt construction uses a timber frame with GRP or aluminium outer skin and a wooden floor.
This style relies heavily on mechanical fixings: many hundreds of screws, aluminium rails and external trim strips at panel joins. Every fixing and gap in those joints is a potential entry point as sealants age and screws corrode.
Modern designs now use composite or plastic blocks rather than wood in the frame, bonded aluminium or GRP panels and GRP or ABS underfloor protection. High-tech structural adhesives and interlocking tongue-and-groove joints reduce the number of mechanical fixings and create more continuous, water-resistant seams.
Some manufacturers introduced aluminium or composite skeleton systems from around 2009 onwards, with woodless wall and floor cores that do not absorb water in the same way if a leak occurs.
Newer models aren’t leak-proof, but a small leak usually causes often less severe because there is less absorbent timber in the structure.
There are trade-offs: earlier motorhomes and caravans often had better passive airflow and were less airtight, so condensation evaporated faster. Modern, well-insulated “sealed boxes” feel warmer but can trap internal moisture if ventilation is poor, increasing condensation-related damp risk while structural ingress risk falls.
Improved construction has allowed manufacturers to offer longer water ingress warranties, commonly 5–10 years, but these usually depend on approved annual checks and correct repair methods.
Using the wrong products or DIY methods on bonded joints can undo the benefits of the original build, so matching repair methods to the construction type is vital. Environmental forces then act on whatever structure you have.
How do weather, UV, and chassis movement contribute to seal and joint failure?
Weather, UV exposure and chassis movement contribute to seal and joint failure by constantly stressing materials and enlarging any tiny imperfections in the body shell.
Daily and seasonal temperature swings cause metals, plastics, glass and sealants to expand and contract at different rates. Over time, this micro-movement slowly stretches joints and breaks the bond at key points.
UV radiation from the sun breaks down many types of sealant and rubber. On roofs, corners and south-facing panels, sealants can become brittle, chalky and cracked. Once they lose elasticity, they can no longer flex with the body, leaving gaps.
Chassis and body flex also matter. Every journey over potholes, speed bumps and uneven surfaces twists the body, especially overhangs and long side panels. This flexing opens micro-gaps in already stressed seams.
Heavy rain pushes water against gaps, these movements make leaks more likely.
Freeze–thaw cycles add another layer of stress. Water that has seeped into hairline cracks freezes, expands and widens the opening. Repeated over one or more winters, this can transform minor gaps into clear leak paths.
Prolonged weathering, standing water, snow or ice on the roof all accelerate joint degradation. The cumulative effect is why sealants and joints should not be treated as “fit and forget”.
Regular inspection, maintenance and proactive renewal after a certain age are essential parts of any long-term water ingress prevention plan. With the causes understood, it is easier to appreciate what happens when water does manage to get into the structure.
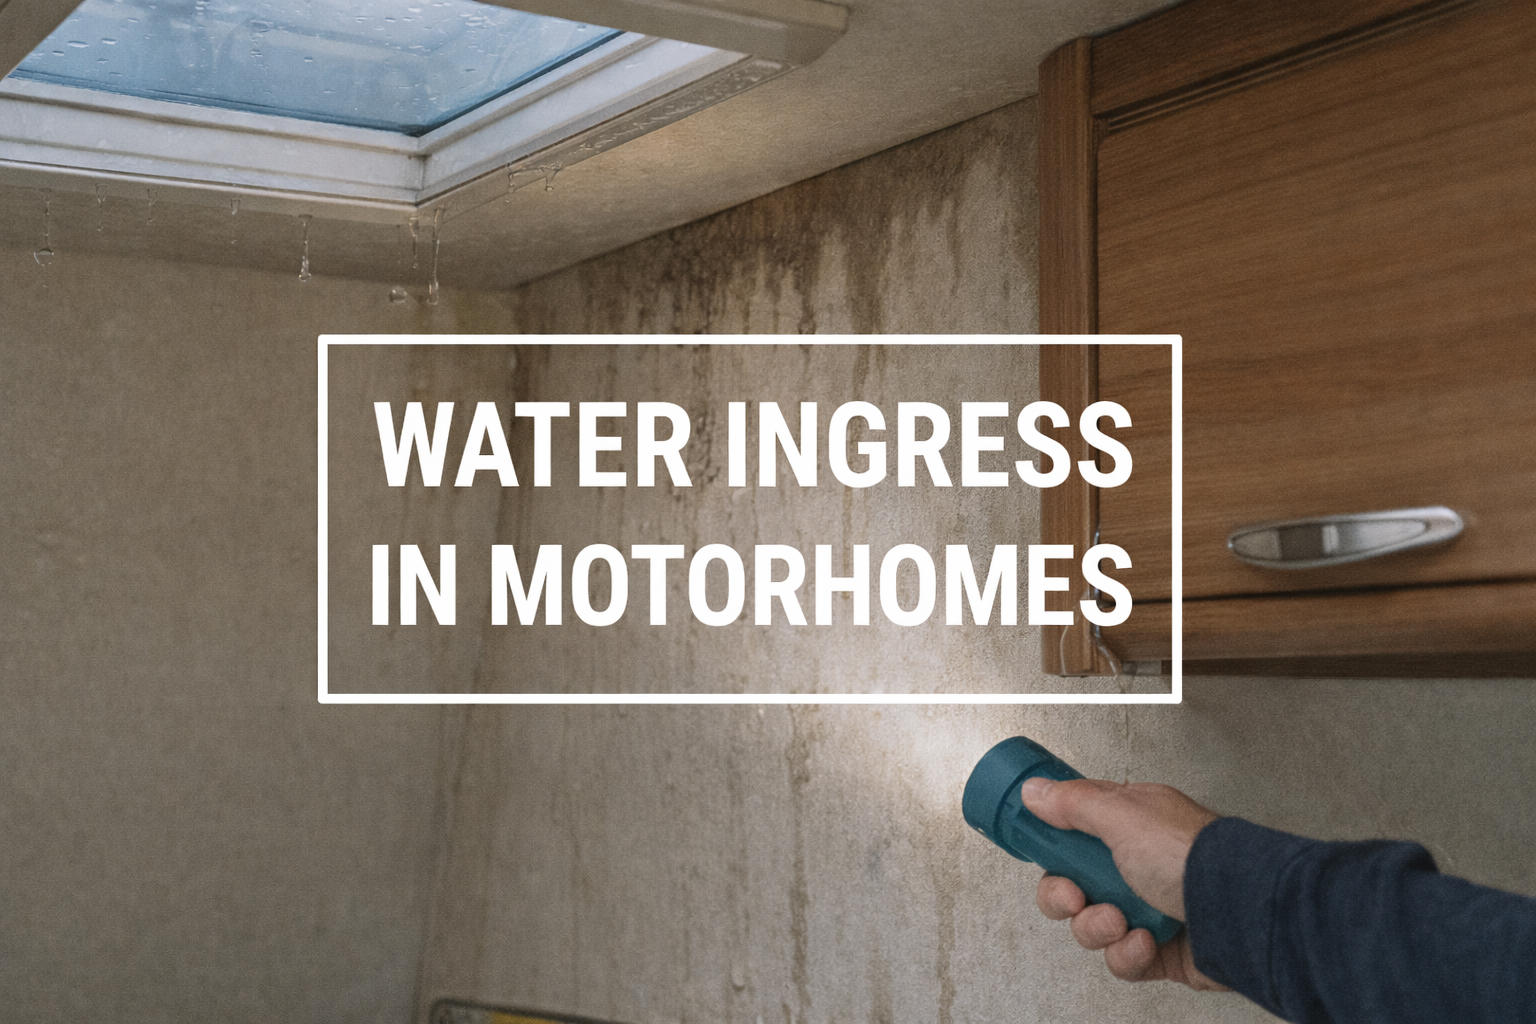
What are the effects of water ingress on a motorhome?
The effects of water ingress on a motorhome range from subtle staining to serious structural damage that can write off the vehicle or wipe out its market value.
Once water penetrates the shell, it is absorbed by timber framing, plywood floors and wallboard. These materials stay damp long after the rain stops, providing ideal conditions for rot, mould and mildew.
Within weeks, timber may turn discoloured and swollen. If the area is repeatedly re-wetted, sustained damp over a few months can trigger proper rot, where the wood softens and loses strength.
- Over time, key structural parts may weaken to the point where walls or floors flex, squeak or even separate, especially near corners and high-stress joints.
- You might notice stained or discoloured wallboard (often black, blue or pinkish patches), bubbling or peeling wallpaper, opening gaps in joint tapes and hairline cracks around seams.
- Floors may feel soft or “squelchy”, particularly along skirting, around doors and under windows.
- Sidewalls can develop a lumpy or “lunar” appearance as the bond between outer skin and inner framework fails, a sign of delamination that experts take seriously.
- Compromised bonding between skins and frame can lead to panel movement and loss of rigidity, sometimes requiring entire wall or floor sections to be replaced.
- The electrical system can also be affected: corroded connections, intermittent faults in lighting and control panels, and even fire risks where water reaches 230V components.
- For people using the van as a second home, mould and mildew bring health risks, particularly for anyone with asthma or allergies, and damp bedding or cushions never really feel comfortable.
Early repairs could set you back a few hundred pounds, but large structural jobs regularly run to several thousand and can exceed £10,000. High moisture readings or visible rot will dramatically reduce trade-in offers and may make the vehicle difficult to sell at all. These realities make early detection crucial.
How can you detect water ingress early?
Detecting water ingress early relies on combining regular visual checks, hands-on inspection, moisture measurements and professional tests into a simple routine you repeat throughout the year.
This guide shows a practical way to spot problems before serious damage. There are 7 key steps in this early-detection routine.
Because water can be “silent” for months, you should not rely on looks alone.
Visual checks can miss hidden issues, so even a basic damp meter and yearly water-tightness or habitation check at an approved service centre are invaluable.
Remember that where you see water or staining is not always where it gets in, as moisture can run along cables, pipes and structural members.
Keeping notes, photos and meter readings in one place will help you and any technicians see trends over time.
Here is a 7-step early-detection routine to follow:
- Carry out regular visual checks
Walk round the vehicle and scan the interior at least monthly. Look for staining, bubbling wallpaper, black streaks from joints, cracked sealant, rusting screw heads and gaps around windows, doors and roof joints. Do the same around the cab, garage space and under the van where you can see floor panels. - Use your hands to feel for soft spots
Press gently along floors, especially by the bed, washroom and doorways, and around lower wall areas. Any soft, spongy or uneven surfaces are a concern. Check ceiling panels around rooflights and vents for subtle ripples or changes in firmness. - Trust your nose with targeted sniff-tests
When you open the motorhome after storage, pay attention to any musty, “milky” or earthy smells. Smell carefully around corners, under seats and inside cupboards. Persistent odours can indicate hidden moisture, even if you cannot yet see anything. - Use a moisture or damp meter if you have one
A basic meter is inexpensive and gives useful background readings. Take meter readings at regular points on walls, floors and ceiling. Record the values and dates. Treat 0–15% as normal, 15–20% as a warning range needing closer attention. - Arrange an annual professional damp or water-tightness test
Each year, arrange a full water tightness or habitation check with an approved workshop. Technicians will use professional-grade meters and a structured checklist, providing a formal damp report that backs up any warranty or insurance requests. - Do special checks after storms or long wet trips
After heavy rain, driving through standing water or winter storms, repeat your visual and tactile checks. This is when fresh ingress is easiest to spot as water may still be moving or visible on surfaces. - Be extra cautious when buying used or after modifications
For used purchases, insist on up-to-date damp reports and consider commissioning your own independent check. When you fit accessories like a solar panel, satellite dish or additional sockets, monitor nearby areas closely for early signs of leaks.
What are the early signs of water ingress?
The early signs of water ingress are usually subtle changes in surfaces, smells and how the interior feels under hand or foot.
Look for subtle clues showing moisture where it shouldn’t be.
Internally, classic visual signs include discolouration or streaks on wallboard, sometimes with black, blue or pinkish tints. You may see bubbling, rippling or lifting in wall coverings, or hairline cracks and gaps where wallboard joints meet and tapes start to peel.
A rough, “pimpling” or stippled wall texture, like a tiny porcupine effect – suggests the board has been wet and dried several times as moisture migrates.
Floors that feel soft, spongy or slightly “squelchy” underfoot, especially along skirting, around doors, under windows and in the washroom, are strong indicators that water has soaked into the floor structure.
Outside, check for loose or bulging trim, warped skirting, cracked sealant, black streaks along awning rails and around windows, and rusting screw heads.
Sidewalls with a lumpy, “lunar” look or obvious delamination where the outer skin moves under pressure are serious warning signs that the bond between panels and frame has failed.
Musty odours when you first open the van, or damp-feeling soft furnishings and bags that never quite dry, also point to ongoing moisture even if visual signs are still developing.
Once you suspect a problem, the right tools make checking much easier.
What tools and methods help you check for moisture?
The main tools for checking moisture in a motorhome are electronic moisture meters, supported by your senses, good lighting and a methodical approach. A moisture or damp meter is gently pressed on walls, floors and ceilings to give a percentage reading, helping you find hidden water ingress.
Basic owner meters can cost as little as around £10 and are fine for background checks, while professional-grade instruments from about £200 to £700 offer better sensitivity, stability and diagnostic features. In professional hands, the process usually has two stages.
First, a non-invasive scan mode is used to sweep large areas and identify “hot spots” where moisture levels are higher. Then pin-probe checks using metal prongs verify readings at key points, avoiding metal fixings that can give false positives.
Standard thresholds help interpret readings:
- 0–15% is generally considered normal
- 15–20% suggests an area to watch and possibly re-check
- 21–30% indicates that remedial action may already be needed
- over 30% points to likely structural damage and inevitable deterioration if left
Owners who use their own meters should treat readings as screening tools, not the final word.
Skilled technicians at a dealer or independent workshop are still best suited to assess borderline cases and provide official reports for warranty, finance and insurance.
Dehumidifying crystals, compact electric dehumidifiers and proper ventilation help control condensation, but they must never be mistaken for a cure for structural leaks. Once you have the tools, the next priority is inspecting high-risk areas safely.
How can you safely inspect high-risk areas?
Safely inspecting high-risk areas involves combining careful access, smart use of equipment and a clear idea of where leaks usually appear. There are 6 steps that help you look after both yourself and the vehicle.
- Plan safe access first: Use a stable ladder with padding where it touches the body and position it on level ground. Never climb on makeshift platforms such as stacked chairs or boxes. For many checks, binoculars or your phone’s zoom can show the roof without climbing.
- Focus on known weak points: Concentrate on roof seals and edges, around skylights and vents, window and door frames, awning rails, wall-to-floor joints, wheel arches and inner corners. Inside, look under seats and beds where leaks often show first.
- Inspect after heavy rain or washing: Try to do some inspections when the vehicle is freshly wet from rain or a gentle wash. Water traces around gaps, stain trails and new dark patches in corners are much easier to spot at these times.
- Use touch and light carefully: Run your hand lightly along joints and seals to feel for gaps or loose sections. A bright torch at a shallow angle can reveal cracks and tiny holes in sealant on panels and roofs.
- Avoid cutting or lifting structural parts: Do not start lifting flooring, drilling test holes or cutting into wallboard without a clear plan. Intrusive work is best left to professionals once you have gathered photos, notes and any meter readings.
- Prioritise personal safety: Never work on wet, icy or windy roofs, and do not risk a fall just for a closer look. Remember that calling a professional or visiting a local workshop costs less than a hospital visit or a damaged van.
Safe inspection goes hand in hand with how and where the vehicle is kept between trips.
How should you store your motorhome to reduce leak risk?
Storing your motorhome to reduce leak risk means thinking about location, protection, preparation, ventilation and checks.
Here are five key storage strategies that work well for UK conditions:
- Choose the best location you reasonably can: Ideal storage is indoors or under a carport-style shelter where the roof is shielded from constant rain but air can still circulate. If parking outside, avoid sitting directly under trees where sap, debris and constant shade encourage algae and damage sealants.
- Use the right cover or shelter: A breathable, tailored motorhome cover allows moisture to escape while protecting against UV, bird mess and tree sap. Non-breathable tarpaulins or improvised plastic sheets trap condensation, damage paintwork and may blow off in strong winds. A well-fitted cover also hides the interior from casual view, adding a small security benefit.
- Prepare the vehicle before lay-up: Store the motorhome as dry as possible. Drain fresh and waste water systems, mop up spills, clean roof and body surfaces and check key seals and joints. This reduces the amount of residual moisture that can feed mould.
- Maintain ventilation inside: Keep internal doors, lockers and under-bed spaces slightly open so air can move through the interior. Fixed vents should never be blocked. Dehumidifying crystals can help keep condensation under control in storage.
- Carry out periodic checks during storage: Visit the vehicle occasionally, ideally once a month in winter. Check for pooling water, damaged covers, new staining or smells and make sure the space around the van is not waterlogged. Acting early on issues is much easier than fixing a season’s neglect.
Even when stored well, UK weather can be hard on seals and joints, so active weatherproofing remains important.
How can you weatherproof your motorhome for prevailing conditions?
Weatherproofing your motorhome for prevailing conditions is about keeping the exterior clean, inspecting and renewing seals, checking accessories and, if necessary, applying fuller coating systems. A practical plan can be broken into six steps:
- Clean the roof and upper body carefully: Wash the roof and upper sides with a soft brush and suitable cleaning products to remove dirt, algae and sap. Avoid high-pressure washers, especially near joints and roof joints, as powerful jets can actually create leaks by lifting weakened sealant.
- Inspect all joints and seals in detail: With the surfaces clean, examine sealant lines, trims and joints closely. Look for hairline cracks, gaps, areas where the sealant has pulled away from panels or appears chalky. These are the places where water is likely to find a way in.
- Maintain or renew sealants correctly: Where issues are found, clean back to sound, dry material. Remove loose or failed sealant rather than simply smearing more over the top. Use high-quality exterior-grade sealants and adhesives suitable for your body materials, following product instructions carefully.
- Check aftermarket accessories and cable routes:
Inspect around solar panels, antennas, satellite dishes, racks and other accessories. Poorly sealed cable glands and conduits can act like rain channels, directing water into gaps. Ensure every fixing and hole has an appropriate seal or gasket in place. - Consider a full exterior sealing or coating system if appropriate: Some owners opt for liquid rubber or similar coatings on certain models. These systems often require 2–3 coats to build the correct thickness, typically using around 1 litre of sealant per square metre of surface, plus a final rubber topcoat applied at roughly 4 litres per 25 square metres. Drying between coats can run to 12 hours or more, so allow 1–2 days. Always check that such work will not affect any warranty.
- Carry out checks after severe weather events: After storms, heavy snow or prolonged driving rain, re-inspect vulnerable joints and accessories. Check for new staining inside and out and consider spot-checking with a meter to confirm no new high readings have appeared.
Weatherproofing outside is only half the story; managing interior condensation and humidity is equally important for long-term comfort and prevention.
How can you manage interior condensation and humidity?
Managing interior condensation and humidity is about changing a few habits, boosting ventilation and using basic tools to manage moisture. You can structure this as a 6-step routine that fits naturally around everyday use.
- Control moisture when cooking: Always open at least a window or roof vent when cooking, and use pan lids where possible. When conditions and site rules permit, consider cooking strong-steam items like pasta outside under an awning to keep extra moisture out of the living space.
- Ventilate and wipe down after showers: Open the bathroom roof vent during and after showers. Wipe shower walls, doors and trays to remove excess water, rather than leaving it to evaporate into the air. This simple habit makes a big difference to humidity levels.
- Manage nighttime ventilation around beds: Crack roof vents or a window slightly where it is safe to do so, and avoid blocking fixed vents with furnishings or bags. A breathable mesh under mattress helps cut condensation beneath the bed. Turning mattresses periodically also allows trapped moisture to escape.
- Be careful about drying wet clothing inside: Avoid drying very wet coats and towels inside if you can use campsite facilities or the home instead. If you have no option, combine indoor drying with maximum ventilation or a small dehumidifier to keep moisture from building up.
- Use moisture-control products sensibly: Dehumidifying crystals are inexpensive and useful during storage. Small electric dehumidifiers can help during winter trips, but bear in mind they only manage moisture, not to fix leaks. Do not rely on them as a solution to structural ingress.
- Insulate large cold surfaces: Fit dedicated external or internal screen covers to the cab glass in cold weather. This reduces condensation on the large windscreen and side windows and helps keep the whole interior more comfortable.
Good condensation management supports the structural measures you take and makes your living space feel fresher and more pleasant. Alongside this, regular formal testing is essential.
How often should you perform a water tightness test?
You should perform a water tightness test at least once a year, and for most modern motorhomes this annual check is a strict condition of the factory water-ingress warranty. Missing it can undermine future claims.
Most manufacturer body integrity warranties run for 5–10 years and usually specify that a water tightness test or full habitation check must be carried out every 12 months, usually within a strict timeframe at an authorised workshop.
Some third-party aftercare warranties extend water ingress cover to vehicles up to around 7 years old, sometimes with a little flexibility if a previous service was missed, but the small print will always stress regular checks and reasonable care.
Low annual mileage is not a reason to avoid testing. In fact, vehicles that sit unused for long periods may suffer more from trapped moisture, sealant aging and lack of ventilation.
Additional checks over the annual minimum are wise after any serious leak, accident damage, major accessory installation or when you notice early signs such as staining or soft spots.
Treat the annual test as a standard part of your maintenance schedule, just like servicing the base vehicle. Over the long term, that habit will save you money and stress.
Which maintenance schedule should you follow across the seasons?
The best maintenance schedule across the seasons is a simple framework that splits tasks into pre-season (spring), peak-use (summer), autumn shut-down and winter lay-up.
This seasonal routine helps you prevent water-ingress problems:
- In spring, focus on a thorough external wash, including the roof, then inspect joints, sealants and accessories closely. Check the interior for any new signs of damp or staining after winter and book your annual habitation check or water tightness test before workshops get busy.
- During summer, concentrate on ventilation and condensation control while the van is in regular use. Get into the habit of quick checks after long wet journeys, storms or trips to the seaside where salt spray is a factor. Respond quickly to any new marks or soft areas before your next holiday.
- In autumn, carefully dry the vehicle after final trips. Clear leaves and debris from the roof, inspect seals again, drain water systems and lubricate key seals and hinges. Decide on a breathable cover or indoor storage as temperatures fall.
- Through winter, aim to visit the motorhome roughly once a month. Check for pooling water, inspect covers, open windows briefly to change the air and sniff for any new musty odours. Many serious rot problems start as small, overlooked issues in one wet season and quietly worsen into the next, so this seasonal routine is an effective form of prevention.
What are the top quick tips that prevent leaks?
The top quick tips that prevent leaks are simple habits that cost very little but dramatically reduce water ingress risk over time. These practical steps build on everything covered in this article.
- First, check external sealant lines, awning rails, skirting joints, window and door seals, roof edges, wall-to-floor joints and wheel arches for cracks, loose fixings or perished rubber several times a year.
- Second, avoid aggressive power-washing. Never direct a pressure washer lance at close range around vents, locker doors, joints or rooflights; if a pressure washer must be used, it should be by someone with professional-grade equipment who understands motorhome bodywork.
- Third, mop up internal spills and leaks immediately. Water from a spilt drink or minor plumbing leak can travel surprisingly far under flooring and into gaps.
- Fourth, inspect around any DIY or aftermarket additions such as racks, aerials, solar panels, extra sockets and apps-controlled accessories. Make sure every fixing hole and cable entry point has a proper external-grade seal.
- Finally, remember the biggest quick win: do not ignore small warning signs. If something looks, smells or feels wrong, arrange a damp check or water tightness test promptly. Early action at this stage is what keeps future repair bills within a sensible range.
How should you deal with water ingress once detected?
Dealing with water ingress once you have detected it means acting quickly to confirm the problem, limit further damage, protect electrics, collect evidence and arrange professional repair and follow-up.
Delays are costly. Treat significant ingress as an emergency, not as a minor annoyance. Waiting until you have “saved up a bit” often turns what might have been a local repair into a major structural rebuild costing many times more.
If water is close to electrics, especially 230V systems, safety comes first – you may need to isolate circuits or unplug hook-up power before doing anything else.
Here is a 6-step plan to follow:
- Confirm the problem and its general extent: Use your eyes, hands and, if you have one, a meter to understand how widespread the damp appears. Note readings, stained areas and soft spots. This gives you a baseline and helps you explain the situation clearly to technicians.
- Contain the water and limit further ingress: Place towels, absorbent cloths or containers under drips. If a clear external gap is visible, a temporary weatherproof tape can help until proper repairs are done. Do not rely on quick sealant smears as a long-term fix.
- Protect electrics and sensitive interior areas: Move cushions, bedding and furnishings away from damp spots and dry them separately. If water is near sockets, chargers, control panels or the consumer unit, switch off affected circuits or the mains supply and seek advice before switching them back on.
- Gather evidence for warranty or insurance: Take clear photos and short videos showing damage, meter readings and any suspect fittings. Retain copies of past damp reports, habitation check paperwork and service history. These documents are important when speaking to a dealer, insurer or warranty provider.
- Get a professional assessment and repair quotes: Contact an approved service centre, dealer or independent specialist with good reviews. Ask for a damp report and written quotes. Expect that a proper diagnosis could involve opening up panels to see the true condition of the structure.
- Plan repairs and aftercare checks: Structural repairs often involve stripping interior panels, removing rotten framework, replacing wallboard and re-bonding skins. Costs can range from a couple of thousand pounds for a small corner to £10,000 or more for extensive rot. Once repairs are done, arrange follow-up moisture checks to confirm readings have stabilised and that no residual damp remains.
Handled in this structured way, even a serious leak can be brought under control. Immediate containment is the first practical step.
What immediate containment steps should you take?
Immediate containment steps are all about limiting further water entry, protecting the interior and securing the area until proper repairs are arranged. There are 5 simple stages you can follow.
- Identify the active leak area as best you can: During or shortly after rain, try to see exactly where water is appearing inside. Note whether it is dripping, tracking along a surface or pooling in a particular place. This information helps technicians later.
- Limit water ingress temporarily: Place towels, absorbent cloths or small containers under drips to stop water spreading across floors and into joints. Outside, if you can safely reach an obvious gap or damaged seal, use suitable waterproof tape as a temporary patch. Do not use DIY sealants at this stage.
- Protect interior surfaces and furnishings: Move cushions, bedding, rugs and any loose furniture clear of damp areas. Take them into the house or a dry space to clean and dry. This reduces mildew risk and keeps items usable.
- Protect electrics and switches off if necessary: If water is close to sockets, lighting, chargers, the control panel or mains inlet, switch off local circuits or disconnect the mains hook-up. Do not attempt to dry electrics with heaters or hairdryers; leave that to professionals.
- Begin controlled drying of affected areas: Open windows and vents to encourage airflow and, where possible, run a fan or small dehumidifier to lower overall humidity. Avoid blasting the area with high heat, which can drive moisture deeper into structures. Remember that containment buys you time; it does not remove the need to find and fix the true entry point.
Once the situation is stabilised, you can decide which jobs you might handle yourself and which belong firmly with a professional.
When should you DIY versus hiring a professional?
You should limit DIY to monitoring, simple cosmetic jobs and very minor sealing, and bring in professionals whenever there is clear structural involvement or high moisture readings.
In other words, if the problem goes beyond obvious surface sealant and meter readings are consistently high, it is a job for the experts.
DIY is generally appropriate for routine checks, basic use of a damp meter, cleaning algae off the roof, and small touch-ups to accessible sealant where you clearly understand the gap and there is no sign of rot. Temporary containment, like taping a cracked vent until replacement, is also DIY work.
However, if moisture readings are consistently between roughly 21–30% or higher, if you find soft timber, spreading stains or any sign of delamination, you should treat it as a “professional more commonly” problem.
Proper repairs often involve stripping interior panelling, removing rotten framework, cutting new structural pieces, re-bonding skins and re-finishing the interior. Such work needs workshop tools, skill and time..
Misjudging a leak can be expensive. A repair that might have been sorted for £500–£600 when first spotted can grow into a £12,000–£15,000 bill if water has spread across a wall or roof.
Always ask for at least one second opinion and request to see meter readings and opened-up areas before agreeing to major work. For newer vehicles, any job affecting the body shell, roof or joints should only be carried out or authorised by an approved repairer to protect your warranty and insurance position.
How do you repair common exterior leak sources?
Repairing common exterior leak sources needs a careful approach centred on correct preparation and follow-up checks rather than quick cosmetic fixes. A 5-step external repair method works well in most cases.
- Diagnose the true leak path: Do not assume the nearest joint to a damp patch is the culprit. Use meter readings, visual clues and controlled hose tests when needed to work out where water is actually entering. Remember that gravity and capillary action can move water along joints and cables before it appears inside.
- Remove failed sealant or gaskets properly: Once you have identified the suspect joint, carefully cut out all loose, cracked or degraded sealant. Clean back to sound surfaces using suitable tools and cleaners. Simply smearing more product over old, contaminated material seldom works and may conceal ongoing issues.
- Dry and prepare the surfaces: Ensure the area is dry and free from dirt, old adhesive and loose paint. On some joints, such as windows and doors, you may need to remove trims or even the frame. Take time to mask surrounding areas so you can apply neat new beads or fit gaskets cleanly.
- Apply the correct new sealing system: Use sealants and bonding products that are designed for exterior motorhome and caravan use, compatible with your body materials. Bathroom silicone and generic DIY sealants are not suitable. Follow manufacturer instructions for bead size, curing times and any required clamping.
- Verify the repair and keep records: After curing, test with gentle water from a hose (not a pressure washer) or wait for natural rain while monitoring meter readings over several days. Log what you did, when, and which products were used. This information is useful for future technicians and, if needed, for warranty or insurance discussions.
Specific leak areas such as windows, doors, roof accessories and wall-to-floor joints all follow this logic but have their own best-practice details.
How do you reseal a window or entry door?
Resealing a window or entry door starts by confirming the frame is the leak source, carefully removing it, cleaning everything back to sound material and installing a new seal before refitting. A 6-step outline keeps the job under control.
- Confirm the frame is the source of the leak: Check for cracks in adjacent panels and other nearby joints first. Use a damp meter around the aperture and, if possible, a controlled water spray to check water enters around the frame, not elsewhere.
- Remove internal trims and fixings: Take off internal trims, blinds and any decorative covers. Unscrew or unbolt fixings evenly. Protect the interior and glazing with cloths or cardboard to avoid accidental damage during removal.
- Ease out the frame carefully: Gently work the frame loose without twisting or bending it. Mark the original position relative to the body with tape or pencil lines so you can realign it perfectly when refitting.
- Clean away all old sealant or gasket: Clear all old butyl, foam or sealant from the frame and body aperture. Use appropriate plastic scrapers and cleaners that will not attack the materials.
- Apply new seal or sealant and refit: Fit a new gasket or bead of correct exterior-grade sealant, replicating the original system as closely as possible. Refit the frame, tightening fixings evenly in a criss-cross pattern to prevent distortion.
- Test for leaks and check surrounding structure: Before final trims go back on, inspect the surrounding wall for any soft or discoloured wood that might indicate deeper damage. Once everything has cured, carry out a hose test to confirm there are no drips or damp spots around the opening.
How do you re-bed roof accessories and AC units?
Re-bedding roof accessories and AC units starts with removing them, renewing the sealing system and refitting to the correct torque, all while working safely at height. A 6-step approach is sensible.
- Isolate power and systems: Disconnect mains hook-up, isolate 12V feeds and, for AC units, follow manufacturer instructions for safe disconnection. This protects both you and the electrical systems during work.
- Remove the accessory and fixings: From inside, undo clamping frames or fixings gradually. Outside, gently lift the accessory clear, taking care not to bend the base or damage surrounding roof panels.
- Scrape and clean away old sealants and gaskets: Remove all traces of old mastic, butyl or gaskets from the roof and accessory base. Clean the surfaces thoroughly and allow them to dry. Inspect the roof skin for cracks or damage.
- Inspect wiring, drain tubes and roof substrate: Look for chafed cables, loose glands or blocked drain tubes (especially on AC units). Ensure the underlying roof substrate has not softened or delaminated. Any suspect areas may need professional attention.
- Install new gasket or sealant bed and refit: Fit the recommended gasket or bead of exterior-grade sealant suited to your roof material, whether GRP, aluminium or another type. Refit the accessory, tightening fixings evenly to compress gaskets without over-compressing or warping the base.
- Record the work and recheck for leaks: Make a note of the date, products used and any observations about the roof condition. After the next few heavy rains, use a meter and visual checks inside to confirm that readings around the aperture remain stable.
How do you address wall-to-floor joint leaks?
Addressing wall-to-floor joint leaks usually requires professional involvement as it includes structural parts and is hard to access. A 5-step process centres on investigation, controlled strip-down, structural repair, resealing and added protection.
- Investigate and map the damage: Use a damp meter to map moisture levels along the wall-to-floor joint, around doors and in adjacent areas. Check under the vehicle where possible for signs of swelling, staining or delamination at the floor edge.
- Carry out controlled strip-down: A specialist removes external capping strips and trims., cleaning out failed sealants. Inside, they may need to lift floor coverings or remove some furniture to see the real state of the floor edge and lower wall.
- Replace damaged structural sections: Any rotten timber or compromised composite at the floor edge must be cut out and replaced with matching treated materials. This work is labour-intensive because the floor was installed before the walls and furniture, so access is awkward.
- Reseal joints with durable, flexible products: Once structural repairs are complete, the wall-to-floor joint is rebuilt and resealed using flexible, high-quality exterior sealants designed to cope with road spray and movement. Refit capping strips and finish them carefully.
- Add underfloor protection where feasible: In some cases, additional underfloor coatings or splash guards can be fitted to protect heavily exposed areas from future road spray. Quick DIY attempts to smear extra sealant on the visible joint without addressing hidden rot risk trapping water and hiding ongoing decay, so it’s best to avoid them.
How do you troubleshoot and fix internal plumbing leaks?
Troubleshooting and fixing internal plumbing leaks means confirming the issue lies within the water system, narrowing down the location and then repairing or replacing faulty parts under controlled conditions. A 6-step flow keeps things logical.
- Confirm the leak is plumbing-related: Check whether the damp only appears when the pump is on, taps are used or tanks are full. If the area dries when the system is drained and remains dry, that strongly points to plumbing rather than external ingress.
- Locate the general area of the leak: Start with visible joints under sinks, behind removable panels, around the water heater, pump and tank connections. Place dry tissue or kitchen roll beneath suspect joints and look for wet patches when the system is pressurised.
- Isolate and dry the area: Turn off the pump and, if needed, drain the system to stop further water flow. Dry the area as much as possible making fresh leaks easier to spot during testing.
- Test under pressure in a controlled way: Turn the pump back on and pressurise the system while watching known weak points. For gravity drains, fill tanks and observe outlet fittings and hoses. Move tissue from joint to joint until you see where it becomes wet first.
- Repair or replace faulty components: Tighten or remake loose compression and push-fit joints, replace perished flexible hoses, cracked elbows or damaged pump parts with components rated for motorhome use and potable water. Ensure the system is drained before dismantling joints.
- Verify no ongoing seepage remains: After repairs, monitor the area over several days of normal use with repeat tissue tests and, ideally, meter readings. Any damp returning suggests either a second leak or incomplete repair, in which case professional help may be needed, especially near electrical or gas appliances.
How can you remediate damp, mold, and odors safely?
Remediating damp, mould and odours safely involves addressing the source, removing affected materials and cleaning in a way that protects your health. A 6-step clean-up plan works well.
- Identify and fix the source of moisture: Before any cleaning, confirm that the leak or condensation problem has been addressed. Treating mould is pointless if water ingress or severe condensation continues unchecked.
- Remove and dry affected soft furnishings: Take damp cushions, mattresses, carpets, curtains and bedding out of the motorhome where possible. Clean and dry them thoroughly in a warm, ventilated place rather than attempting to dry everything inside the van.
- Clean hard surfaces carefully: Use mild detergents or specialist cleaners recommended for motorhome interiors to wipe down walls, furniture, shower cubicles and other hard surfaces. Do not use harsh chemicals that could harm finishes.
- Treat mould with suitable products and protection: Mould and mildew can pose health risks, especially for those with asthma or allergies. Wear gloves and, when handling significant visible growth, wear an appropriate mask. Use appropriate mould treatment products, following safety instructions exactly.
- Ventilate and dehumidify the interior: Once cleaned, ventilate the motorhome well and, if conditions allow, use a dehumidifier to bring humidity back to normal levels. This helps remove residual moisture from furnishings and surfaces.
- Monitor for recurrence with checks and meter readings: Keep an eye (and nose) on previously affected areas. Re-check with a meter after a few weeks to confirm that moisture levels remain low. If mould or smells return quickly, the underlying moisture source may not be fully resolved.
Where damp has led to structural delamination or serious damage, more invasive work is required.
How do you assess and repair hidden structural damage or delamination?
Assessing and repairing hidden structural damage or delamination involves recognising serious symptoms, mapping the affected area and performing professional rebuilds when needed.
A 5-step pathway explains how specialists usually approach it:
- Recognise symptoms that suggest structural problems: Delamination on sidewalls – where the outer skin looks lumpy, moves under hand pressure or has clearly pulled away – is a strong indicator of serious moisture-related bond failure. High meter readings internal “pimpling” confirm this issue.
- Map the affected area with a moisture meter: Technicians use a high-quality meter to define the size and shape of the wet zone, taking readings across panels, corners and joints. They differentiate genuine damp from false readings caused by metalwork, wiring or insulation.
- Open up strategically to expose the structure: Interior trim, wallboard and furniture panels are removed in specific areas to expose the underlying frame and insulation. This controlled strip-down reveals the true extent of rot or damaged composite material.
- Replace damaged structure and re-bond skins: Rotten timber is cut out and replaced with matching treated wood or composite. New wallboard or panels are cut to shape. Where necessary, outer skins are re-bonded to the repaired framework using structural adhesives, restoring strength and rigidity.
- Finish, test and document the repair: After rebuilding, re-finish interiors and test the area with moisture meters and, sometimes, controlled water sprays. Detailed written quotes and repair reports are usually provided, as these jobs can easily run into many thousands of pounds. Some roof “movement” is normal by design, but similar lumpiness on sidewalls with high moisture readings is rarely something to ignore.
How should you manage insurance and warranty claims?
You should manage insurance and warranty claims by notifying providers promptly, supplying clear evidence and understanding the conditions that govern cover for water ingress. Delays or incomplete paperwork can undermine valid claims.
As soon as you suspect ingress, check your warranty documentation and motorhome insurance policy.
Manufacturer water-ingress warranties, usually last 5–10 years, almost always require documented annual water tightness or habitation checks at approved workshops. Missing these can invalidate cover, even when the vehicle is still within the age limit.
Some aftercare warranties can provide water ingress protection for vehicles up to around 7 years old and may be slightly more flexible about missed services, but they still expect evidence that you have taken reasonable care and avoided unauthorised modifications.
Leaks caused by poorly fitted aftermarket accessories, DIY holes in the roof or obvious neglect may be excluded.
Keep copies of damp reports, meter readings, photos, repair invoices and emails. Keeping these records helps confirm timelines and demonstrate that professionals have been involved and support your account of events.
For major structural work, seek more than one quote and, if practical, visit the service centre mid-repair to see opened-up areas yourself. This builds trust and clarity at a time when large sums and the future of your vehicle are on the line.
Why is an annual water tightness test your best defense?
An annual water tightness test is your best defence against serious water damage in your motorhome as it is usually the most reliable method to spot early ingress before visible signs emerge.
For the cost of a routine check, you gain an expert snapshot of your motorhome’s internal moisture state and a chance to fix small problems before they become large ones.
These tests are commonly bundled into a wider habitation check, where gas, heating and electrical systems are also inspected.
Although not legally required like an MOT for your car, this type of service acts as the safety inspection for the “home” part of your vehicle. Many manufacturers recognise industry-approved workshop schemes and use their reports when deciding warranty claims.
Even when your motorhome has barely been used over a year, sealants age and condensation can build. Low usage does not guarantee a dry interior. Professional testers use calibrated digital meters and structured checklists that cover walls, ceilings, floors, corners, joints, wheel arches and other high-risk areas. A damp report is then issued showing percentage readings, locations and comments, which becomes part of your service history.
The cost of a yearly test is modest compared with potential savings. Catching a leak as readings creep into the 15–20% range can limit repairs to a localised area. Waiting to check until readings burst past 30% may leave you facing structural work costing many thousands of pounds. Scheduling tests outside busy pre-holiday periods reduces delays and keeps you within warranty deadlines, giving you extra peace of mind.
What does the water tightness check involve?
A water tightness check involves a trained technician using a high-quality moisture meter to take systematic readings across your motorhome’s interior surfaces and interpreting them in context. The goal is to spot areas of elevated moisture that suggest ingress or developing issues.
The process usually starts with a non-invasive scan mode, passing the meter across walls, ceilings and floors, including behind furniture, inside cupboards and lockers, around windows and doors, along roof and wall joints and near wheel arches and floor edges. If higher readings appear during the scan, the technician takes focused measurements and may use pin-probe checks in accessible areas, taking care not to touch metal components that could distort results.
Typical interpretation thresholds are widely used: readings of 0–15% are usually acceptable and often go unrecorded.
Values between 15–20% warrant further investigation and monitoring.
Readings in the 21–30% range indicate that remedial work is probably needed, while anything over 30% suggests structural damage is ready present, with decay likely to worsen if ignored.
Experienced technicians learn to distinguish genuine damp from false readings caused by hidden metal, wiring or certain insulation materials. The results are usually documented on a damp chart or report with numbered locations, percentages and comments.
You should keep this with your other paperwork, as it is valuable evidence for future warranty, dealer trade-in discussions and your own long-term maintenance planning.
To understand exactly what this test entails and how technicians pinpoint potential problem areas, it helps to look closely at the step-by-step process of a water tightness check.
Why is it critical to prevent water damage before it starts?
It is critical to prevent water damage before it starts because avoiding ingress is far cheaper and easier than repairing the structural problems it causes.
Once water has soaked into timber, insulation and wallboard, reversing the damage often means stripping out large sections of the interior and rebuilding them, which is disruptive and expensive.
Timber can discolour within weeks of staying damp and begin to rot within a few months if it is repeatedly re-wetted.
By the time you notice obvious symptoms – soft floors, staining, delamination – the decay may already be advanced.
By then, repairs can cost several thousand pounds or even tip into the £10,000 bracket for full wall or roof panel replacements.
There are safety implications too. Water ingress can corrode electrical connections, compromise lighting and control systems and potentially increase fire risk where moisture meets 230V wiring. Mould and mildew raise health concerns for you and your passengers, particularly children and anyone with respiratory problems.
Water damage shortens the effective life of the motorhome and undermines its resale value. Buyers and dealers naturally wary of vehicles with high meter readings or a history of serious damp. Simple preventive habits – regular checks, good storage, condensation management, protecting joints and accessories, and an annual water tightness test – are what stop small issues becoming major headaches. Prevention is the one “product” that always gives more value than it costs.
Knowing the true cost of water damage makes it easier to see why some widely held beliefs about motorhome water ingress can be misleading.
What common myths about motorhome water ingress should you ignore?
There are four common myths about motorhome water ingress that you should ignore because they can lull owners into a false sense of security:
- A common one is “if there’s no smell, there’s no damp”. Motorhomes do not have plastered walls like houses, so they often do not smell obviously damp even when structural components are wet. The reliable guide is a moisture meter and proper checks, not just your nose.
- Another myth is that “covers cause damp”. Properly sized, breathable motorhome covers let moisture escape while protecting the body from rain, UV and sap. It is non-breathable tarps and improvised plastic sheets that trap condensation and cause problems.
- Many people also believe “a quick blast with a pressure washer won’t hurt”. Concentrated jets can lift weakened sealant, force water into vents and gaps and start leaks where none existed. Then comes the idea: “I don’t use it much, so I don’t need annual checks”. Seals age whether you drive or not, and unused vehicles can suffer the most from trapped moisture.
- Finally, a cheap damp meter is not the same as a professional instrument in trained hands, and smearing silicone over a gap rarely provides a lasting fix. Proper prevention and repair rely on understanding water ingress, not shortcuts.
Conclusion
Water ingress is one of the most destructive threats to a motorhome, yet it is largely preventable when you adopt a proactive mindset and the right routine. Leaks usually begin at small cracks around joints, seals, screw holes and accessories, and the first visible signs can be far from the actual entry point as water tracks along hidden routes.
Once timber and wallboard become saturated, structural rot, delamination and serious electrical issues can follow, driving repair costs into the thousands.
Modern construction, composites and better coatings have reduced risks, but no model is immune, and water ingress warranties typically last 5–10 years and rely on recorded annual checks.
Good storage, sensible use of covers, everyday condensation management and regular inspections all play their part.
If you act quickly on suspicious signs, seek expert advice when moisture readings rise, and avoid quick fixes that hide rather than solve problems, you will protect both your comfort and your motorhome’s long-term value.
Treat water-ingress care as a normal part of ownership, just like servicing the base vehicle, and it will reward you with many more dry, trouble-free trips.